

Xiaomi Home Setup Guide
The Xiaomi Home integration connects the smart devices under your Mi Home / Xiaomi account to Home Assistant. After signing in to your account and completing verification, your supported Xiaomi Home devices are synced into HA for unified management and control. This guide walks through the full process of setting up the Xiaomi Home integration on Donggua HAOS.
Version information
Section titled “Version information”| Name | OS | Core | Xiaomi home |
|---|---|---|---|
| Version | 17.0 | 2025.2.1 | 0.4.7 |
Prerequisites
Section titled “Prerequisites”Before you start, make sure:
- Donggua HAOS ships with the required components pre-installed; if an update is needed, update them through HACS.
- Your smart devices have already been added to your Xiaomi account in the Mi Home / Xiaomi app.
- The HA box, your computer, and all smart devices are on the same local network (see the “Smart Device Network Setup” doc for detailed configuration).
- Have your Xiaomi account ready (used for sign-in authorization).
Note: not every device under your account is fully supported yet — only devices on the compatibility list are supported.
Setup steps
Section titled “Setup steps”Step 1: Go to Settings → Devices & Services → Add Integration
Section titled “Step 1: Go to Settings → Devices & Services → Add Integration”In Home Assistant, go to Settings → Devices & Services, then click Add Integration in the bottom-right corner.
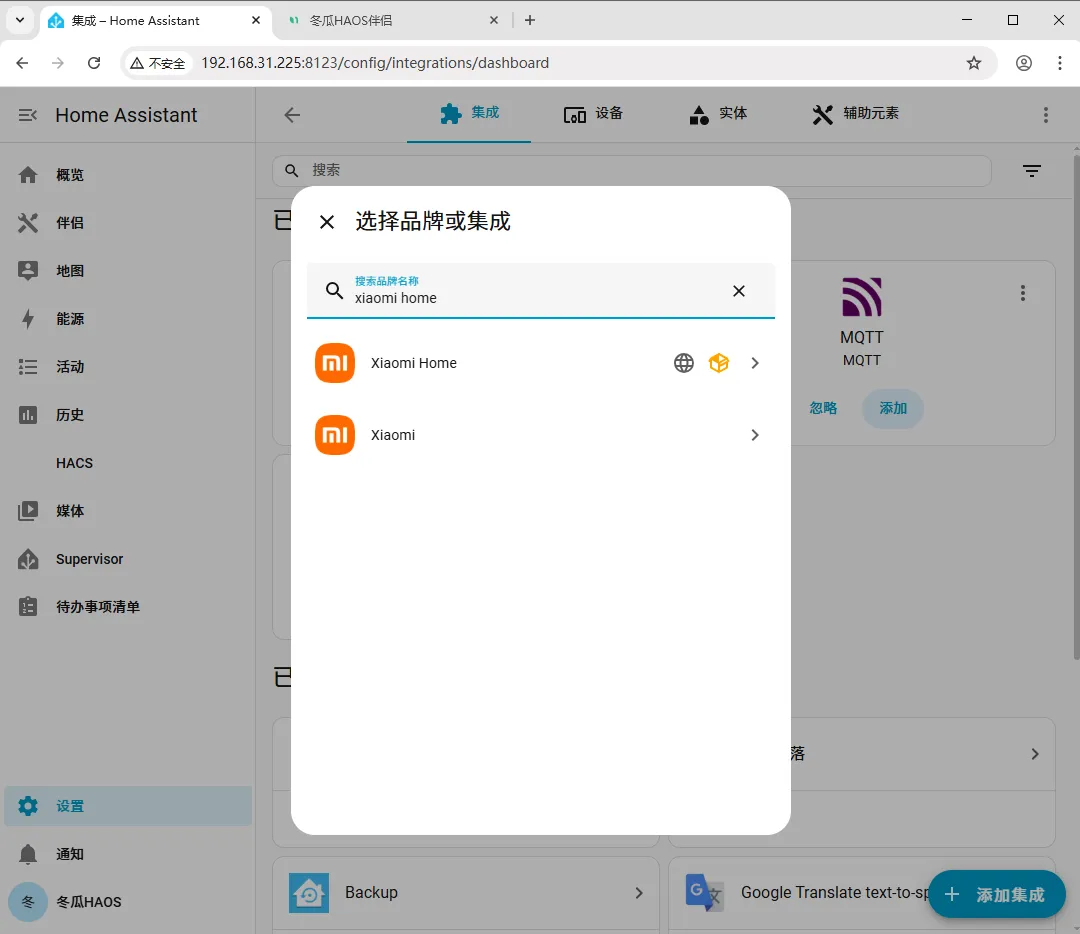
Step 2: Search for xiaomi home
Section titled “Step 2: Search for xiaomi home”Type xiaomi home into the search box that appears, then click the “Xiaomi Home” integration in the search results.
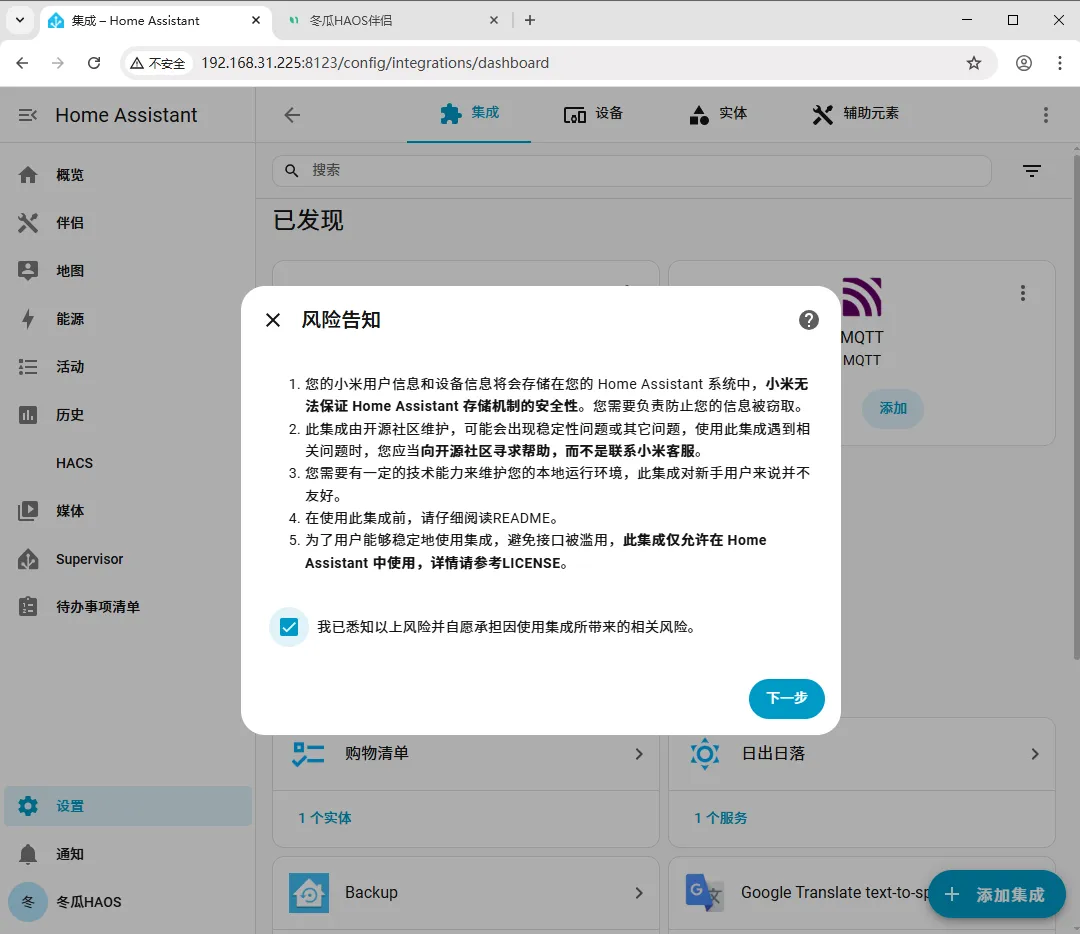
Step 3: Read and accept the terms
Section titled “Step 3: Read and accept the terms”Check the “I have read and understood…” terms, then click Next; after confirming the information is correct, click Next again.
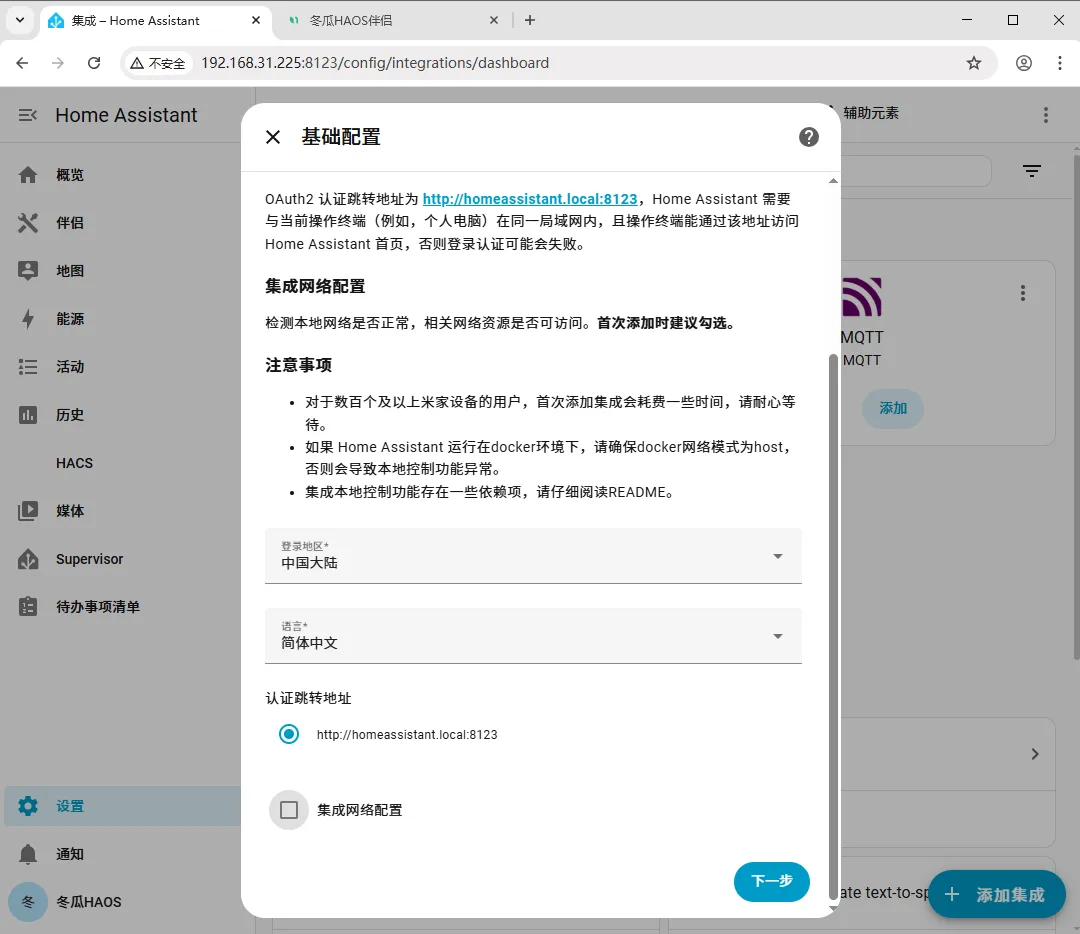
Step 4: Start signing in to your Xiaomi account
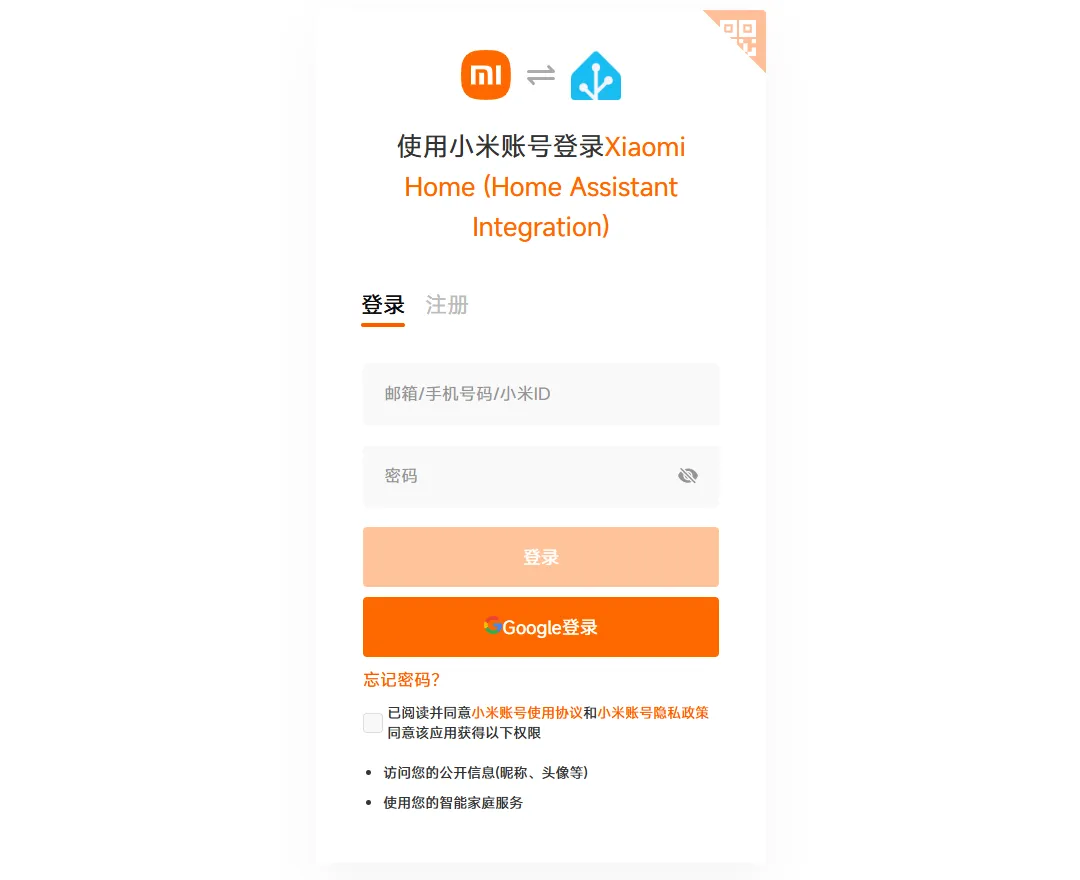
Section titled “Step 4: Start signing in to your Xiaomi account”On the sign-in page, click “Please click here to sign in” to open the Xiaomi account sign-in screen.
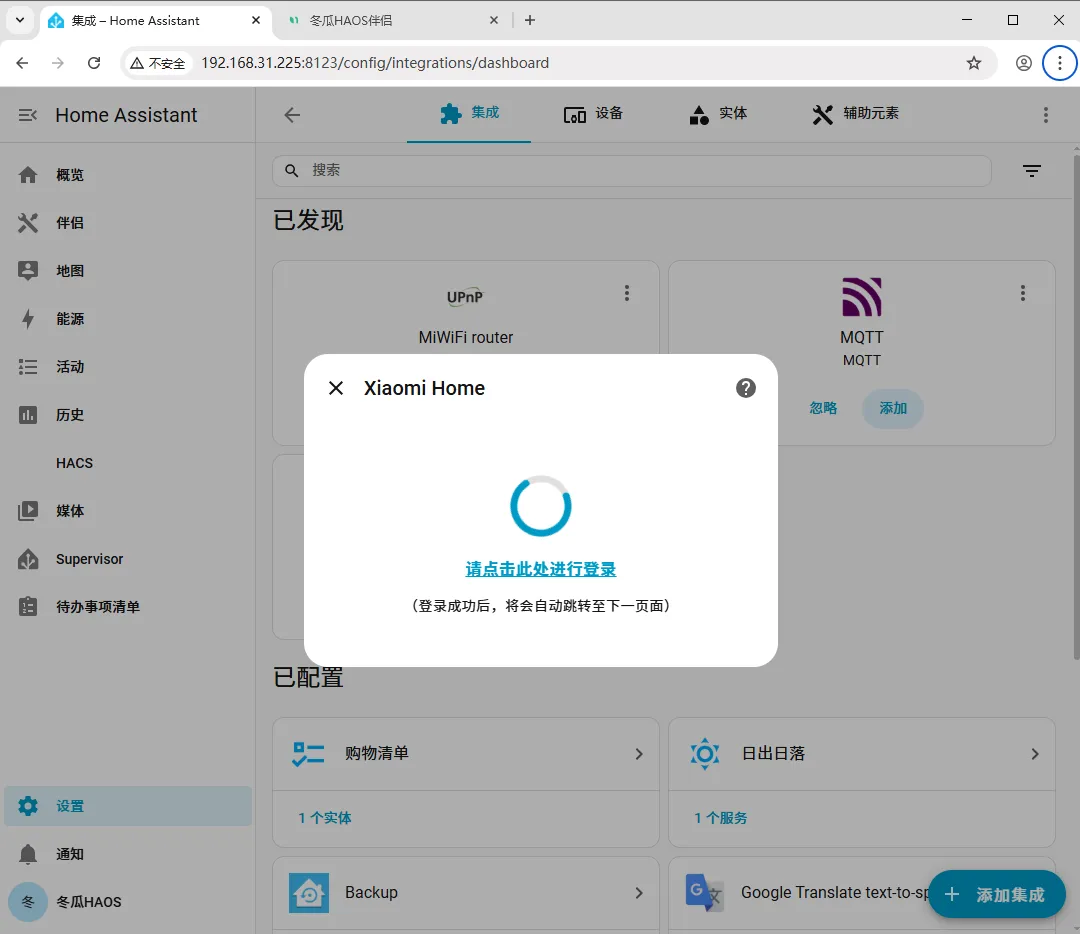
Step 5: Sign in to your Xiaomi account
Section titled “Step 5: Sign in to your Xiaomi account”Sign in to your Xiaomi account using username and password or QR code scan. After signing in successfully, return to the HA screen and confirm the displayed account information is correct.
Step 6: Choose a verification method
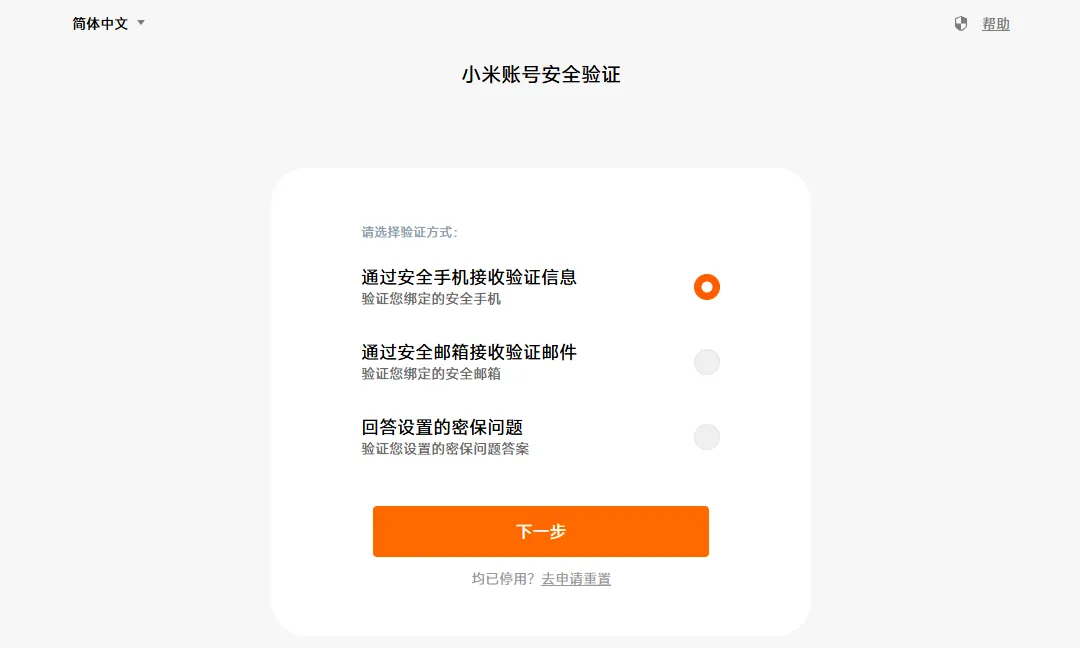
Section titled “Step 6: Choose a verification method”At the verification step, choose a verification method (such as email or SMS).
Step 7: Get and enter the verification code
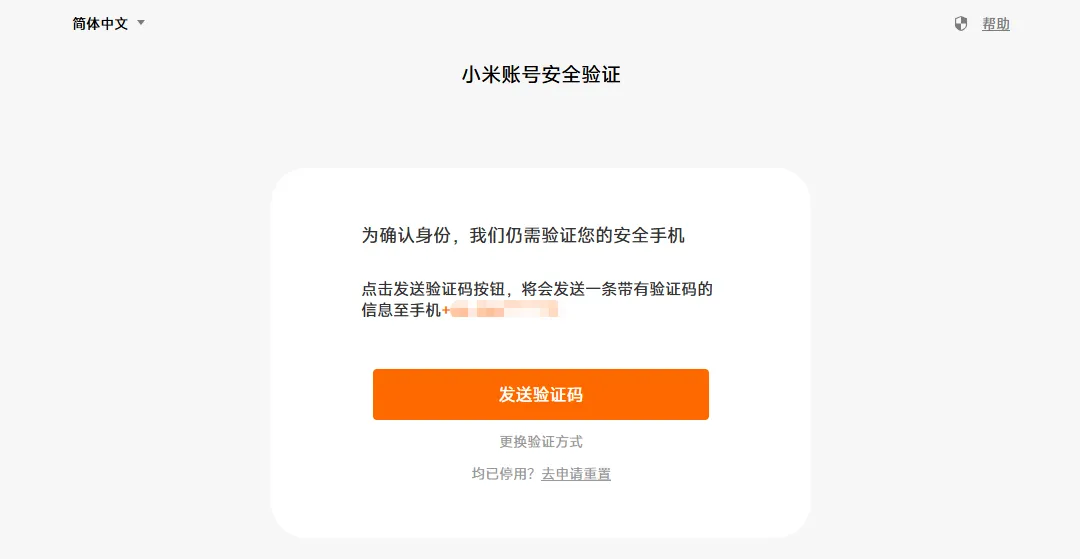
Section titled “Step 7: Get and enter the verification code”Click Send verification code, enter the code you receive into the input box, then click Confirm to complete verification.
Step 8: Switch to the HA device IP if needed
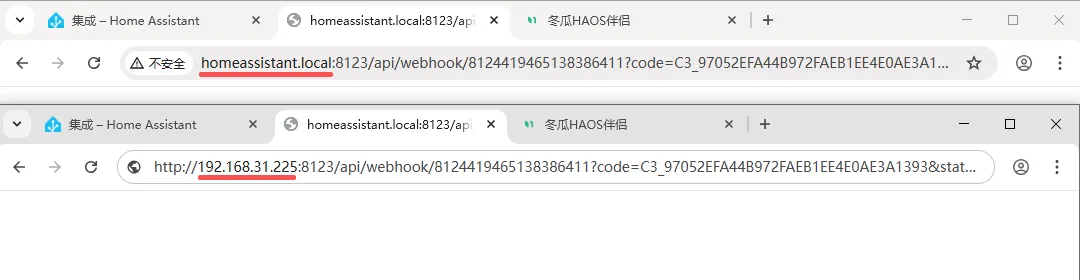
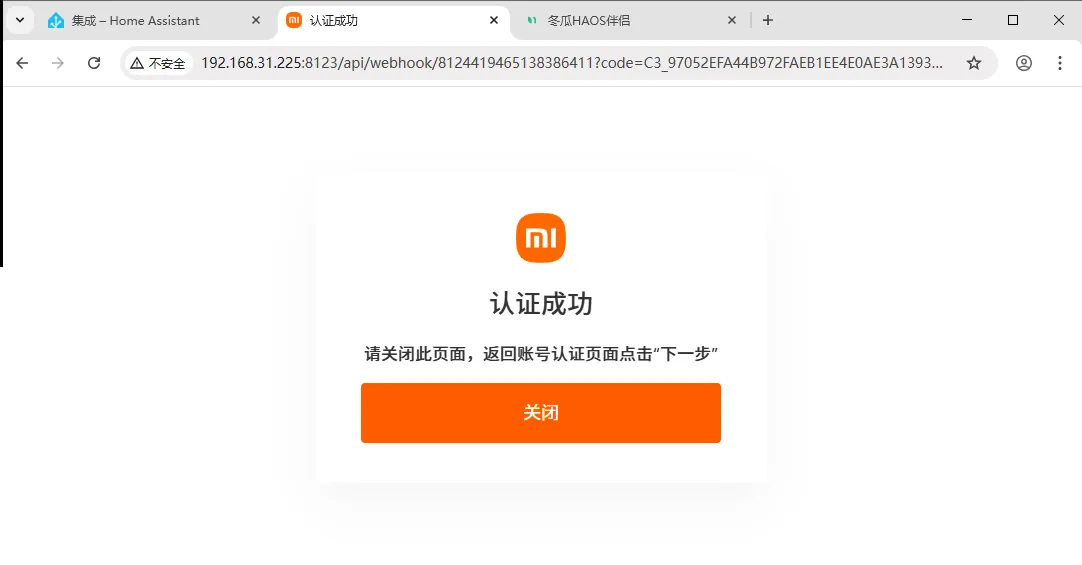
Section titled “Step 8: Switch to the HA device IP if needed”If the page shows up blank (white), you are on the IP sign-in path. In that case, replace homeassistant.local in the browser address bar with the actual IP address of your HA device.
Step 9: Confirm authentication succeeded
Section titled “Step 9: Confirm authentication succeeded”Press Enter to confirm, and wait for the page to show the “Authentication successful” message.
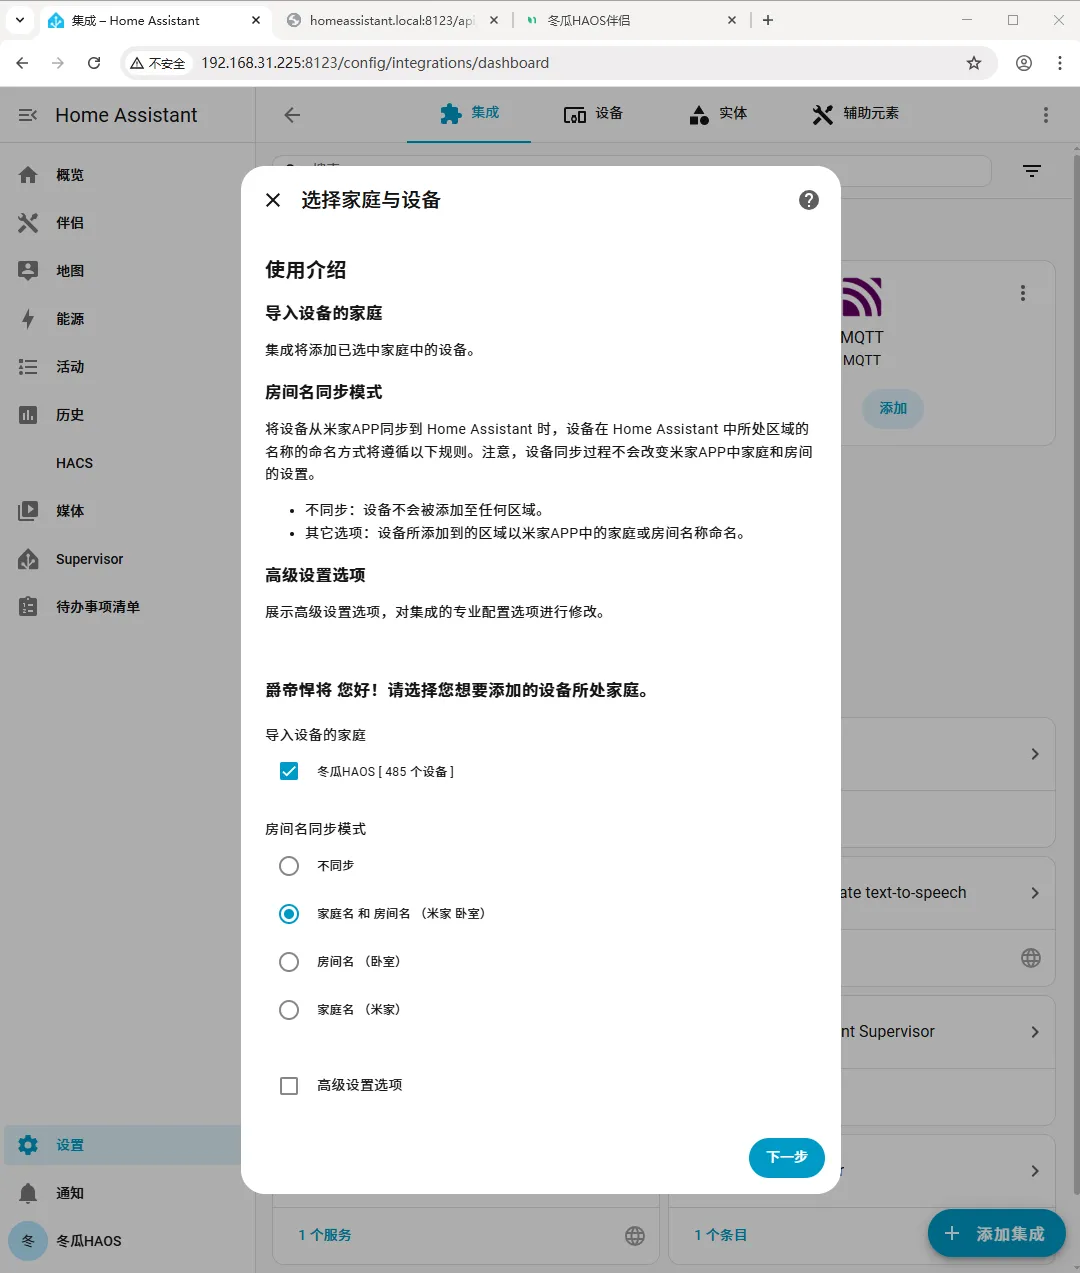
Step 10: Choose the devices to import and the sync mode
Section titled “Step 10: Choose the devices to import and the sync mode”Return to the HA screen, check the devices you want to import, and choose the corresponding sync mode.
Step 11: Finish the import
Section titled “Step 11: Finish the import”Click Next, and the system shows the list of supported devices. Setup is complete.
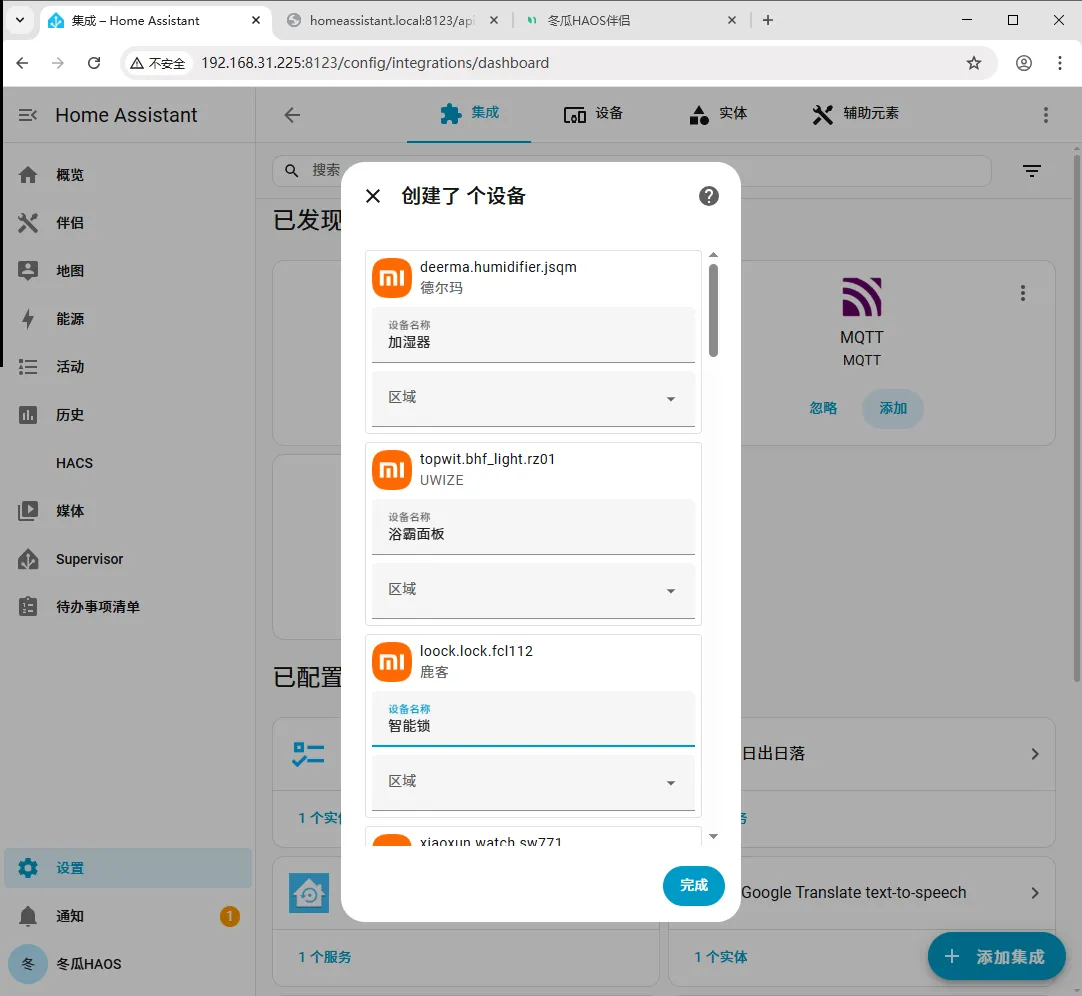
Note: not every device under your account is fully supported; the list of supported devices shown by the system is authoritative.
Updating the device list
Section titled “Updating the device list”When new devices are added to your account and you need to re-sync, update in these 3 steps:
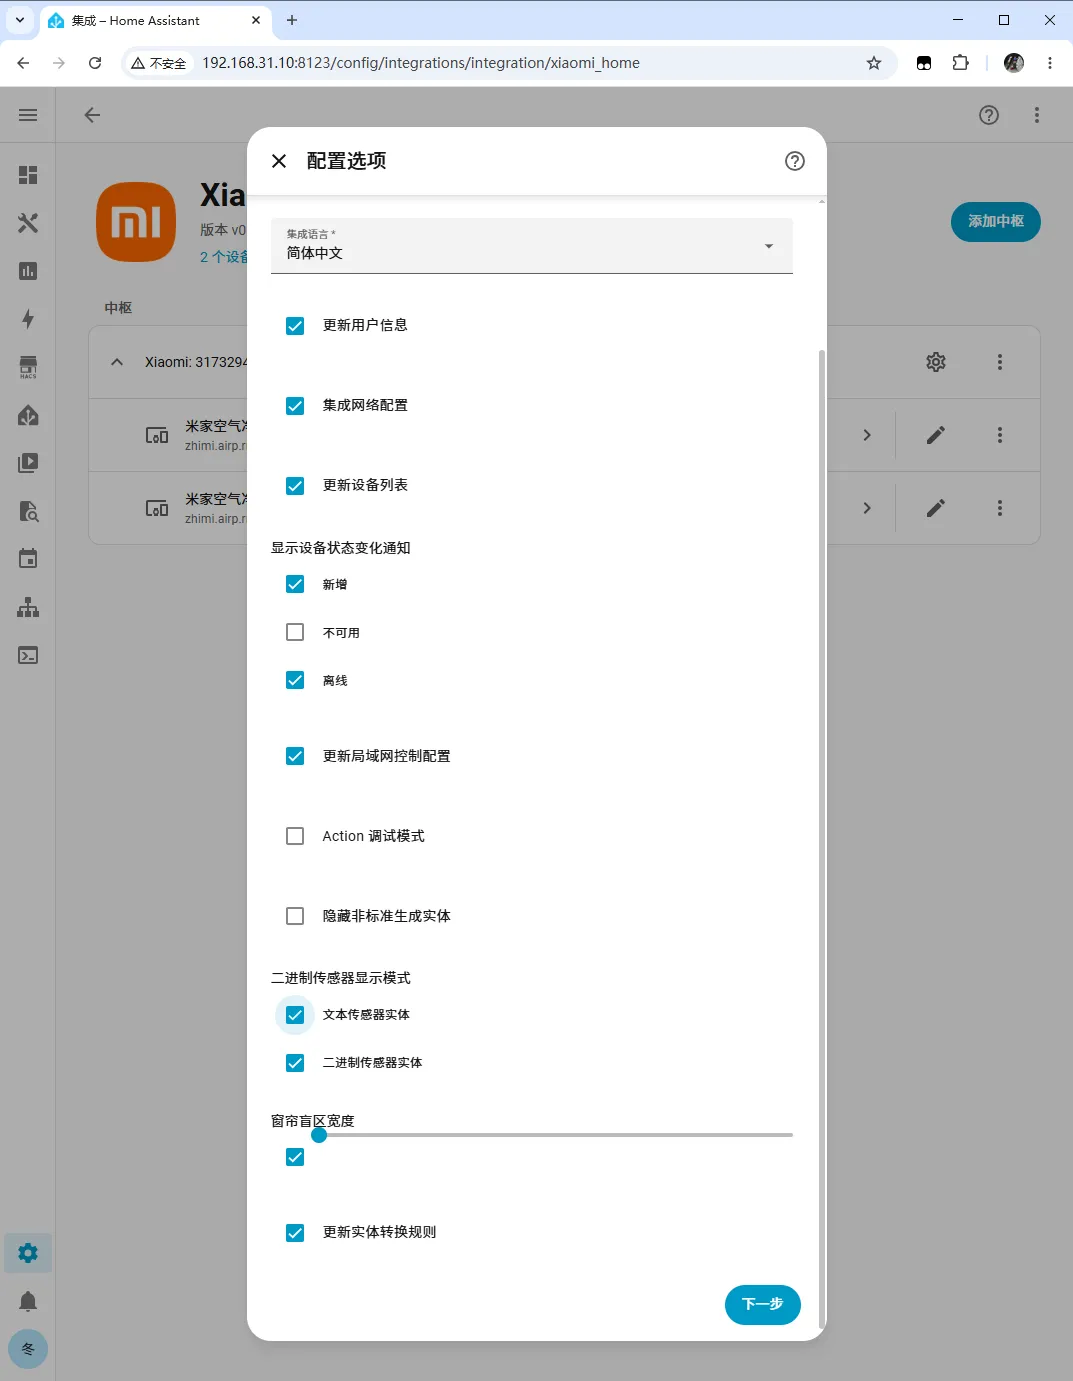
Step 1: Open the integration configuration
Section titled “Step 1: Open the integration configuration”Go to the Xiaomi Home integration settings, click the gear ⚙ icon to open the configuration options page, check the appropriate options as prompted, then click Next.
Step 2: Handle device filtering
Section titled “Step 2: Handle device filtering”If you previously set up device filtering, check the corresponding filter options; if you never set up filtering, just click Next.
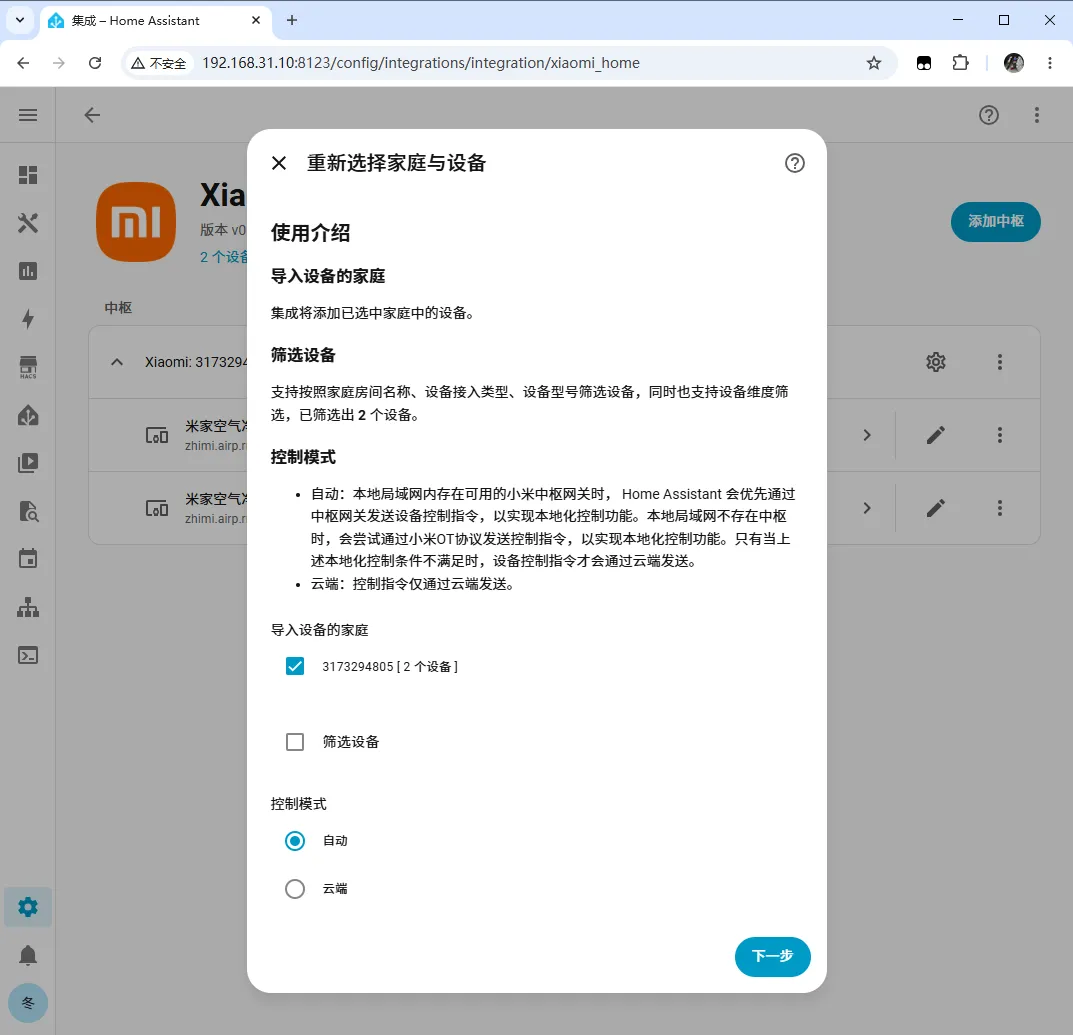
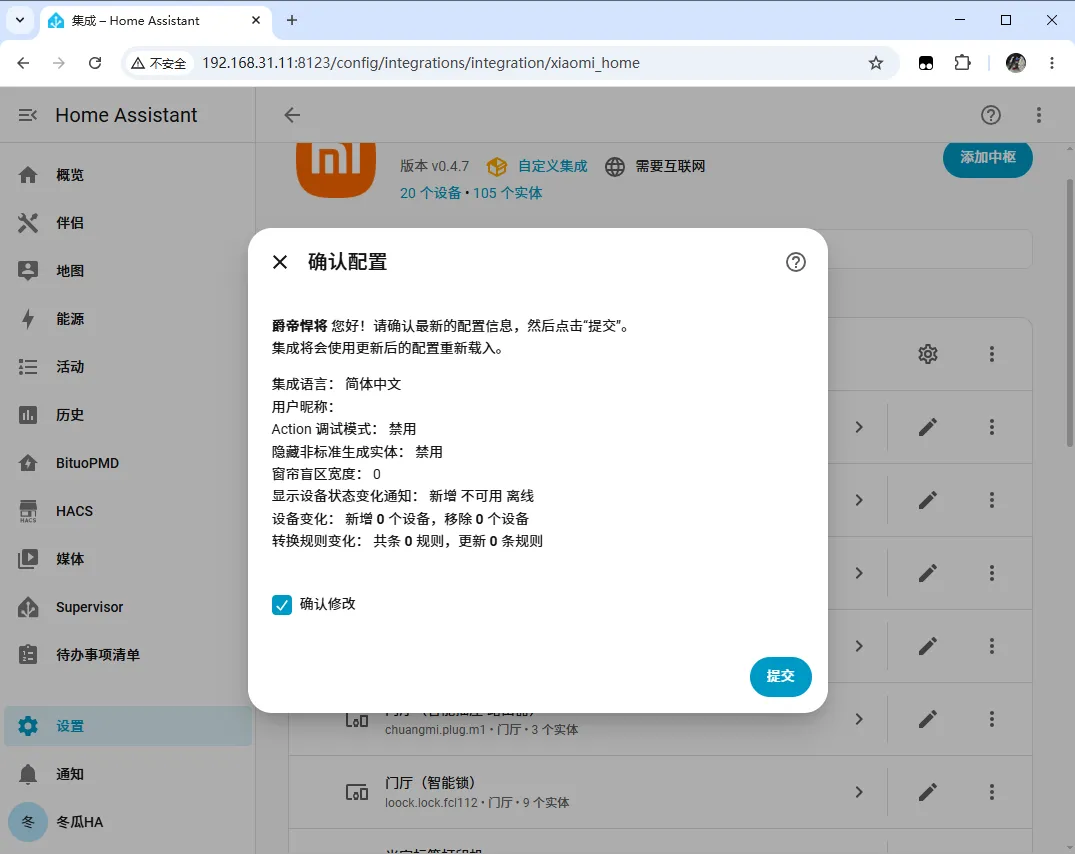
Step 3: Submit and save
Section titled “Step 3: Submit and save”Check the “Confirm changes” checkbox, then click the Submit button to save the update.
| Problem | Solution |
|---|---|
| Can’t find the xiaomi home integration in search | Confirm the Donggua HAOS components are installed; update them through HACS and retry, or restart Home Assistant once and search again. |
| Page shows blank (white) after signing in | This is the IP sign-in path. Replace homeassistant.local in the address bar with the actual IP address of your HA device, press Enter, and wait for “Authentication successful”. |
| Not receiving the verification code | Confirm the chosen verification method (email / phone) is correct, click “Send verification code” again, and note that codes expire. |
| Some devices not imported / unavailable | Not every device under your account is fully supported yet — only devices on the compatibility list are supported. |
| Newly added devices don’t show up | Open the integration settings, click the gear ⚙, and run through the “Updating the device list” flow again and submit. |
Summary
Section titled “Summary”The core flow for setting up Xiaomi Home is: Add Integration → search xiaomi home → accept the terms → sign in to your Xiaomi account → verification code → (switch to IP if needed) authentication successful → select devices and sync. Once done, you can manage your supported Xiaomi Home devices in Home Assistant; for devices added later, open the configuration via the gear ⚙ to update the device list.