

EZVIZ Camera Integration Tutorial
This tutorial explains how to connect an EZVIZ camera to Home Assistant over the RTSP protocol. For EZVIZ cameras, you first need to disable video encryption, change the video codec, and enable RTSP in the EZVIZ mobile app, then connect the camera using HA’s “Generic Camera” integration.
Version Information
Section titled “Version Information”| Item | OS | Core |
|---|---|---|
| Version | 17.0 | 2026.2 |
Prerequisites
Section titled “Prerequisites”Before you start, make sure:
- Your Home Assistant is running normally and you can access its admin interface.
- The camera has been added to the EZVIZ app on your phone.
- Your phone and the camera are connected to the same router’s WiFi, on the same local network as HA.
- You have the login credentials ready:
- Username: admin
- Verification code: printed on the camera body
- We strongly recommend asking before purchase whether the camera supports the RTSP and ONVIF protocols.
Official documentation: https://www.home-assistant.io/integrations/generic/
Integration Steps
Section titled “Integration Steps”Step 1: Disable Video Encryption
Section titled “Step 1: Disable Video Encryption”Open the EZVIZ app, find the camera you want to connect, and go to Settings — Privacy Settings — disable video encryption.
Step 2: Look Up the Camera’s IP Address
Section titled “Step 2: Look Up the Camera’s IP Address”Make sure your phone and the camera are connected to the same router’s WiFi, then go to EZVIZ app > Profile > Tools > LAN Device Preview and note down the camera’s IP address. When prompted, enter the device verification code (six uppercase letters).
Step 3: Change the Video Codec to H264
Section titled “Step 3: Change the Video Codec to H264”Tap the gear icon in the top-right corner to open the settings, and in Video Settings change the codec from H265 to H264.
Step 4: Enable RTSP
Section titled “Step 4: Enable RTSP”Go to More Settings > Local Service Switch > enable RTSP.
Step 5: Add the “Generic Camera” Integration in HA
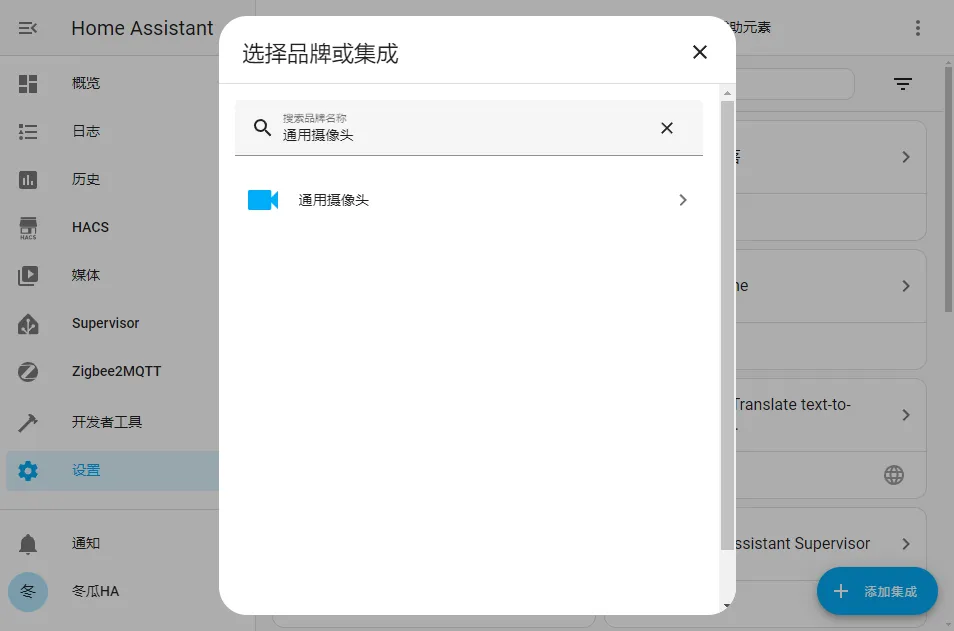
Section titled “Step 5: Add the “Generic Camera” Integration in HA”In HA, go to Settings > Devices & Services > Integrations > Add Integration > search for “Generic Camera”.
Step 6: Fill In the Configuration Parameters and Submit
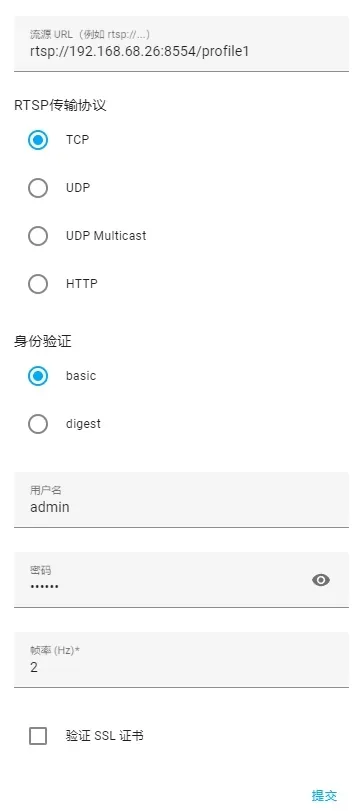
Section titled “Step 6: Fill In the Configuration Parameters and Submit”Referring to the glossary in the table below, fill in the configuration parameters in the dialog and click “Submit”.
| No. | Field | Description |
|---|---|---|
| 1 | Stream source URL | The device’s IP address and path |
| 2 | RTSP protocol | The network transport protocol to use |
| 3 | Authentication | The default, basic, is fine |
| 4 | Username | The default account, admin |
| 5 | Password | The verification code on the camera body |
| Problem | Solution |
|---|---|
| No video after connecting | Make sure you have disabled video encryption and enabled RTSP in the EZVIZ app, and changed the video codec to H264. |
| Cannot find the camera’s IP address | In the EZVIZ app, go to Profile > Tools > LAN Device Preview to look up and note down the IP. |
| What are the password / verification code? | The default username is admin; the password is the verification code printed on the camera body (six uppercase letters). |
| How to avoid pitfalls before buying | We strongly recommend asking before purchase whether the camera supports the RTSP / ONVIF protocols. |
Summary
Section titled “Summary”The core EZVIZ camera integration flow is: in the EZVIZ app, disable video encryption → look up the IP → switch the codec to H264 → enable RTSP, then in HA use the “Generic Camera” integration and fill in the stream source URL, username (admin), and password (the verification code on the camera body) to complete the setup.